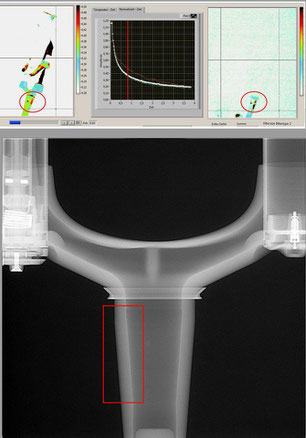
Comparison of IRT (InfraRedThermography) and CT / X-ray
Interesting comparison of impulse thermography or sonotherm and CT / X-ray. After a proper delamination was detected in the shaft of this fork, the customer was advised to replace it. The customer sent the fork to a well-known manufacturer, who then performed a "CT". The CT showed no abnormality and the customer was wished a lot of fun with his fork in the coming summer. To this I say: hopefully the customer will survive the coming summer.
Different results - Why is this so in testing carbon structures ?
The X-ray procedure works according to the principle of radiography. The more material "gets in the way" of the radiation, the more energy is absorbed and comes out the back. There is a detector there that measures the weakening of the radiation. A delamination is an opening in the material that does not contribute to radiation attenuation from most radiographic positions. If it is a delamination with contact touches (called kissing bonds), it is virtually impossible to see such damage with the X-ray method.
In active thermography, different types of excitation are used to induce heat flows. If the material is excited e.g. by ultrasound, the volume is set into high-frequency oscillations with the aim that in case of cracks or delamination, interfaces generate friction and heat which spread in the material and can be measured with a high-resolution camera. This only works with adjacent surfaces. Disengaged surfaces do not generate a signal because nothing rubs there.
In this case the surface is heated with a heat pulse (light pulse). This creates a high temperature gradient, which induces a heat flow into the material. If the penetrating heat meets a gaping delamination, the heat flow is disturbed and a measurement signal appears on the surface. If the delamination is in contact, the heat wave passes through the material without producing a significant effect.
The smallest defects in the material, e.g. fibre breaks or white cracks in the resin, cannot be detected by any test method. It would then also be difficult to make a clear statement as to whether a frame is permissible or not. Unfortunately, there are places in every frame which are questionable due to the manual production. In material testing, extensive practical experience is required to interpret measurement results correctly.
The choice of the correct measuring method and many years of experience are decisive for further riding safety after a fall.
Mechanical stiffness testing in carbon bikesport
The frame is clamped / mounted in a test bench to measure the stiffness of the defective frame. During this process, the alignment, torsional and stiffness values are recorded to determine that no further damage is present. If the frame appears weaker than the visible damage can explain, additional thermographic measurements can be made to detect hidden damage.
Mechanical stiffness tests based on comparative values of new, unused carbon frames can thus prove material damage, but exact localization for targeted repair is thus impossible and has little significance in the case of kissing bonds, delaminations with contact touches.
Further information under FRAMEWORK EXAMINATION, or under:
Carl IR Messtechnik
Dipl. - Ing. Volker Carl
Thermografie Stufe 3 Prüfer
Thyssenstrasse 183a
D - 46535 Dinslaken
Tel.: 02064 6035 12
www.impulsthermografie.de
certified according to EN4179 aerospace standard
Share with friends
Start your request on oiur CONTACT page.


Kommentar schreiben